Creating a great landing page can feel like a chore, especially when you’re not a designer or coder. That’s where tools like Unbounce come in.
If you’ve ever wanted to quickly build stunning, high-converting pages without the hassle, Unbounce might be your solution.
In this review, I’ll share what makes Unbounce stand out, from its drag-and-drop editor to its smart AI tools that help optimize your pages.
We’ll also look at whether it lives up to its reputation as the “future of landing page builders.” By the end, you’ll know if it’s the right tool for your business or if other platforms might work better for you.
Let’s dive into how Unbounce could simplify your marketing strategy and boost your results.
What is Unbounce?
Unbounce is a Canadian software company founded in 2009 that offers a no-code platform for creating and optimizing landing pages, pop-ups, and sticky bars.
It enables marketers to design, publish, and A/B test high-converting pages without coding skills.
Key features include a drag-and-drop builder, AI-powered tools for copywriting and optimization, and seamless integrations with various marketing tools, all aimed at enhancing digital marketing campaigns.
[button-red url=”https://digitalmarketerr.com/recommends/unbounce/” target=”_blank” position=”center”]🔥Try Unbounce Now[/button-red]
Unbounce Key Features
Unbounce offers several key features designed to enhance digital marketing efforts:
1. Drag-and-Drop Builder: Create and customize landing pages without coding, using an intuitive interface.
2. AI-Powered Smart Builder: Utilize artificial intelligence to generate optimized landing pages tailored to specific audiences and goals.
3. A/B Testing: Conduct experiments on landing page variants to identify the most effective designs and content.
4. Pop-Ups and Sticky Bars: Implement customizable pop-ups and sticky bars to capture user attention and drive engagement.
5. AI Copywriting (Smart Copy): Generate, expand, or refine marketing copy using AI, assisting in crafting compelling content.
6. Integrations: Seamlessly connect with various marketing tools and platforms, including CRM systems and email marketing services, to streamline workflows.
How to Get Started with Unbounce?
1. Create an Unbounce Account
Visit Unbounce and click Start My Free Trial:
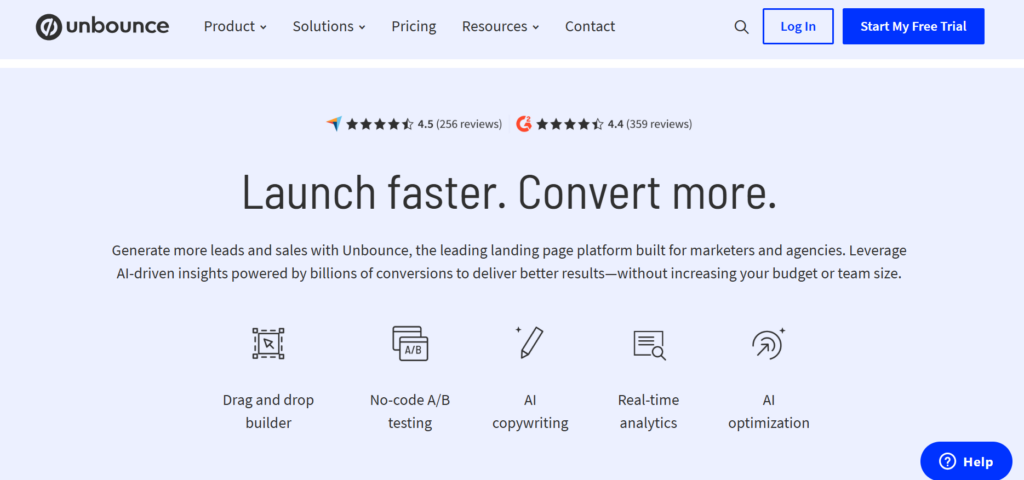
On the next page, select the plan you want and click Start Building for Free:
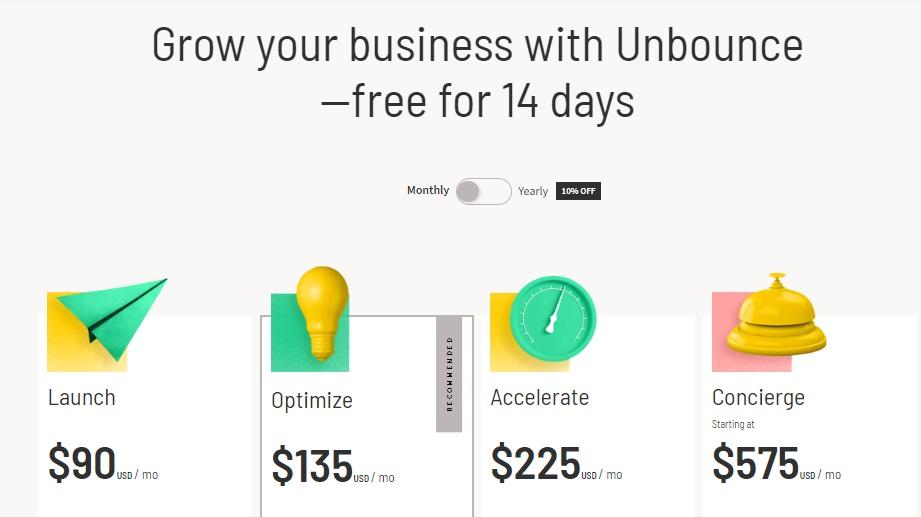
This will take you to the account creation page, where you can sign up using your Google credentials or enter a name, email and password:
From there, you’ll must enter your credit card details to access the free trial. This is hardly ideal, as there’s always the risk that you’ll decide not to use Unbounce but forget to cancel the trial and end up being charged.
Given that plenty of other SaaS platforms (like BuzzSumo, for example) offer free trials without requiring a credit card, there’s no reason why Unbounce can’t do that, too. Still, that’s a minor gripe compared to the many things there is to like about this tool.
Once you’re done with that, confirm your email address using the verification link sent to your inbox, sign in and you’re ready to start.
2. Create a New Group
When you first log in, your dashboard will be pretty empty, but you can start filling it up with those high-converting landing pages in minutes.
To begin that process, create a group to quickly and easily access all pages and pop-ups from a particular campaign or project. Click on +New Group in the left-hand menu:
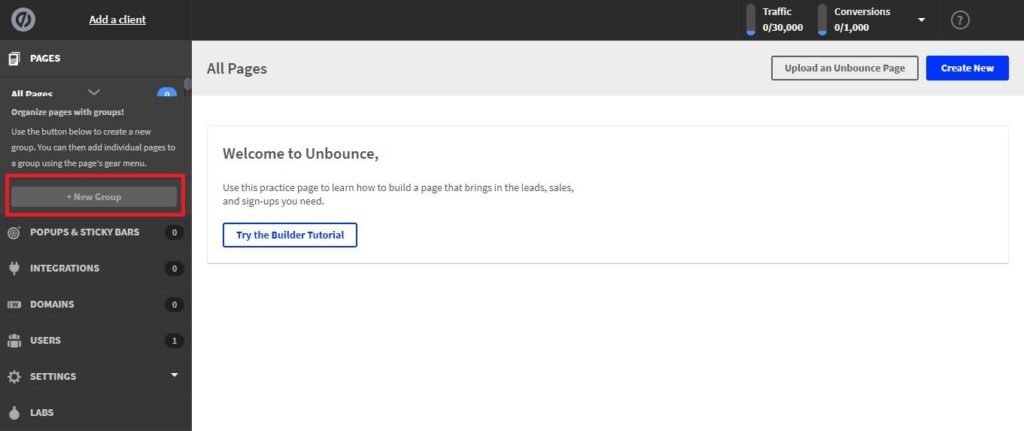
Give your group a name, then tap Create Group:
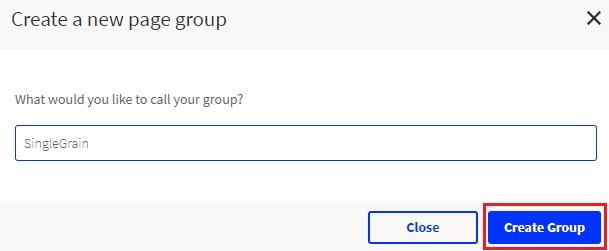
At this point, you may find the Unbounce dashboard is not quite as intuitive as you’d like. I don’t know about you, but I’d expect that new group to appear in the dashboard’s main right-hand panel. But nope. Instead, you’ll find it at the top in the left-hand menu:
3. Create a New Landing Page
After opening your group dashboard, click the Create New button:

Next, choose either the Classic Builder or the Smart Builder landing page:
I’ll look at both in this tutorial, but for now, let’s start with the classic builder.
4. Select an Unbounce Landing Page Template
To begin creating your landing page, you’ll first need to select a customizable template.
While you could always scroll through the library of annoyingly small template thumbnails, you may find it quicker to use the drop-down menu, which will filter your search to only those templates that suit your needs:
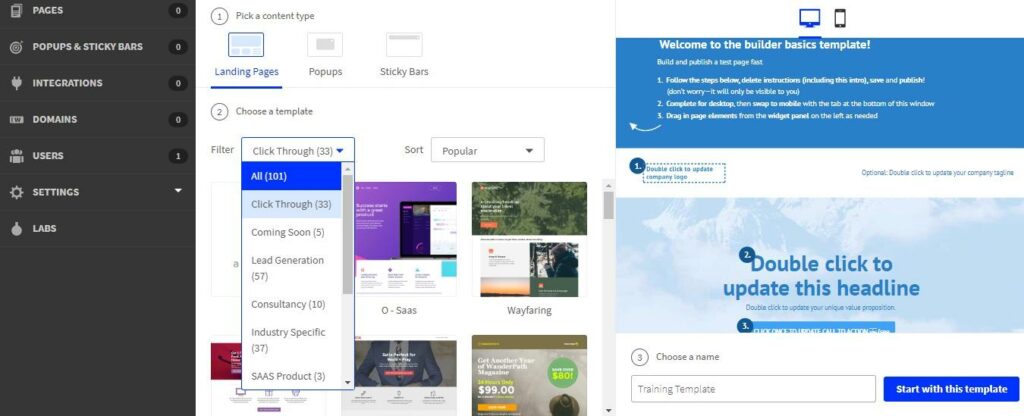
Once you’ve found the one you like, clicking it will generate a preview. If you’re happy with it, give your landing page a name and click Start with this template:
5. Edit Your Page Template
Selecting your template will open it up in the Unbounce page editor:
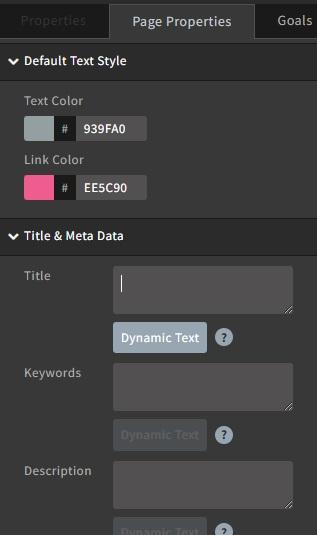
Here, you have the full-page preview on one side of the screen, which updates in real time as you make changes. On the other side of the screen, you can start by customizing page-wide properties such as your colors, meta information and image quality:
Editing the content and design of your page is as straightforward as tapping on any element on the page.
To edit text, for example, click on the text element to bring up the editing tools. Change the wording of your text in the live preview and use the menu options to apply custom formatting.
To add a new element, like an image, select it from the options on the left, then drag and drop it into place on your page to customize it:
At the bottom of the screen, you’ll find the controls to add any custom CSS or Javascript you want to use:
Along with mobile and desktop preview options, the bottom menu also contains a feature called Contents. This brings up a navigational menu to help you quickly jump to individual components on your page:
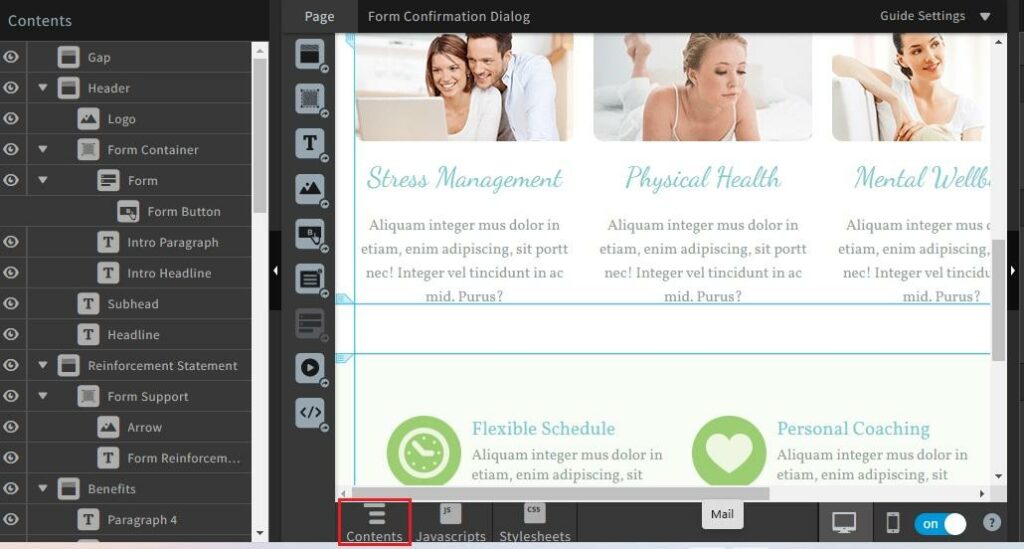
On the plus side, this makes jumping around to different components on your page easier. On the downside, it causes the whole screen to bunch up, meaning you have to scroll sideways to view the entire width of your page.
When you’re finished fine-tuning your page, be sure to hit Save and Preview.
6. Add a Domain and Publish Your Landing Page
Once you’re pleased with your landing page, hit the Overview button in the top left-hand corner to bring up the details for that page:
Next, click Set up your first domain:
Here, you can choose where to publish your new landing page. Ideally, you’ll want to publish it to your own branded domain name, and you can do that by clicking +Add a New Domain.
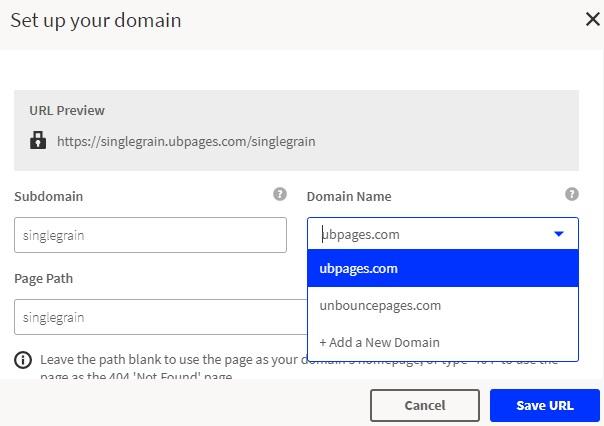
Which will return you to the page details page where you will tap Publish:
You’ll have one last opportunity to check over your page’s details before hitting the Publish button again to make that page live.
7. Creating a Smart Landing Page
If you’d rather use the smart landing page creator, select it from the Create New Page options. Your first task is to tell Unbounce about your company, project and goals:
The quick form asks you to provide the following details:
- Company or project name
- Industry/niche
- Page purpose (selling an e-book, lead generation, etc.)
- Whether or not to include a form
- Page name
Having done all that, click Next: Style this page:
On the next screen, apply one of the 25 global styling options to your page and click Create Copy. This brings up the AI text generator.
To use it, enter a description of your company, product or service and tap Generate Copy.
The AI generator then works on filling your page with optimized content. If you don’t like the suggested copy, you can always click Generate More Copy to try something different or select Choose This Option to go with Unbounce’s suggestion.
Fortunately, you can make any tweaks and adjustments using the basic page editor.
Though not as feature-rich as the Classic Page Builder, I’d argue that this smart editor is actually the more intuitive of the two, making light work out of the entire customization process. Just click any element and use the on-screen controls to customize it to your liking.
You can also use the Apps tool to integrate all those extra features I discussed earlier:
Once all that’s done, the only thing left to do is hit Save and Publish, and your new, fully optimized landing page will be live and ready to generate results.
How much does Unbounce cost?
Unbounce offers four pricing plans to cater to various business needs:
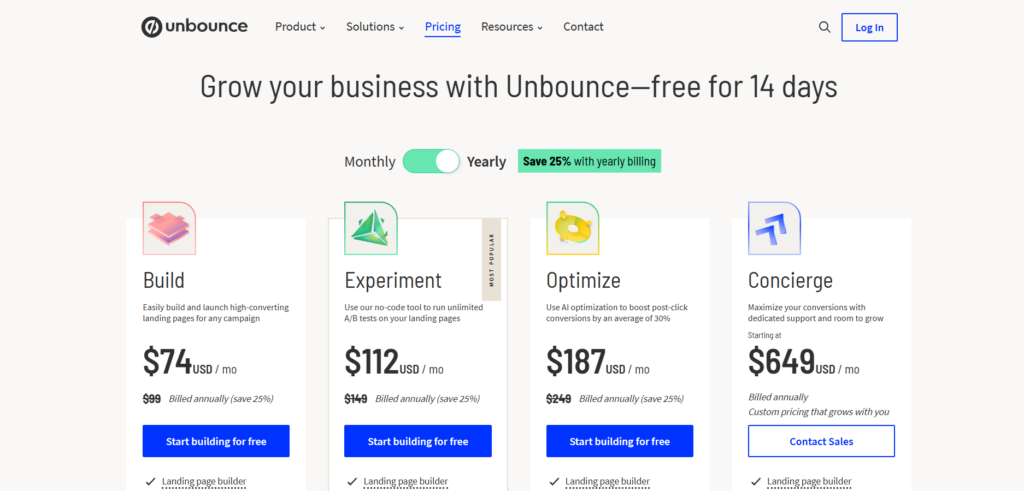
1. Build: Priced at $74 per month, this plan includes unlimited landing pages, pop-ups, and sticky bars, with support for up to 20,000 unique visitors and one domain.
2. Experiment: At $112 per month, this plan offers all features of the Build plan, plus unlimited A/B testing, advanced reporting, and support for up to 30,000 unique visitors and two domains.
3. Optimize: For $187 per month, this plan includes all Experiment features, along with AI optimization tools, visitor behavior insights, and accommodates up to 50,000 unique visitors and three domains.
4. Concierge: Starting at $649 per month, this plan provides all Optimize features, dedicated customer success management, and is designed for businesses with higher traffic and conversion needs, supporting over 100,000 unique visitors and five or more domains.
Unbounce offers a 14-day free trial for new users to explore its features.
[button-red url=”https://digitalmarketerr.com/recommends/unbounce/” target=”_blank” position=”center”]🔥Try Unbounce Now[/button-red]
The Final Verdict
Unbounce is a game-changer for businesses seeking high-performing landing pages. Its user-friendly drag-and-drop builder, AI-powered Smart Builder, and extensive customization options make it a top choice for marketers.
The platform’s A/B testing and conversion-focused features empower users to optimize campaigns effortlessly.
While pricing might be on the higher side, the value it offers in boosting conversions justifies the investment.
Whether you’re a startup or an established brand, Unbounce provides the tools to create impactful landing pages with minimal effort.
It’s not just a landing page builder; it’s a complete solution for growing your online presence effectively and efficiently.
[button-red url=”https://digitalmarketerr.com/recommends/unbounce/” target=”_blank” position=”center”]🔥Try Unbounce Now[/button-red]
FAQ’s
What is Unbounce used for?
Unbounce is primarily used for creating and optimizing landing pages, pop-ups, and sticky bars to increase conversions in digital marketing campaigns without the need for coding skills.
Does Unbounce offer a free trial?
Yes, Unbounce offers a 14-day free trial so users can explore its features before committing to a paid plan.
How much does Unbounce cost?
Unbounce’s pricing starts at $74 per month for the Build plan, with more advanced plans available for higher traffic and additional features.
Does Unbounce integrate with other marketing tools?
Yes, Unbounce integrates seamlessly with various tools such as CRM systems, email marketing services, and analytics tools to streamline workflows.
Can I use Unbounce without coding knowledge?
Absolutely. Unbounce’s drag-and-drop builder is designed for marketers with no coding skills, making it easy to create custom landing pages.
What kind of support does Unbounce offer?
Unbounce offers customer support through chat, email, and a dedicated success team on higher plans, along with a knowledge base for self-guided help.
Is Unbounce good for A/B testing?
Yes, Unbounce has built-in A/B testing features that allow users to test multiple versions of a landing page to identify the highest-performing version.

